Things to know before incubating Coturnix quail eggs.
If you're taking the exciting plunge into the world of quail breeding, you're in for a delightful journey! Coturnix quail are known for their ease of care, rapid growth, and the charming sounds they make. Before you start incubating your hatching eggs, here are some essential tips and information to ensure a successful hatch.
Things to Know Before Incubating Coturnix Quail Hatching Eggs
If you're taking the exciting plunge into the world of quail breeding, you're in for a delightful journey! Coturnix quail are known for their ease of care, rapid growth, and the charming sounds they make. Before you start incubating your hatching eggs, here are some essential tips and information to ensure a successful hatch.
Understanding Coturnix Quail
Coturnix quail, also known as Japanese quail, are small, hardy birds that are often raised for their eggs, meat, and as pets. They typically reach maturity quickly, laying eggs as early as six weeks old. This makes them a great choice for new breeders eager to see results in a short time.
Egg Selection
Before you even think about turning on the incubator, it's crucial to select the right eggs. Look for clean, uncracked eggs from healthy adult quail. The eggs should have a matte finish rather than being glossy. Remember, fresher eggs have a higher hatch rate, so try to use eggs that are no more than a week old.
Incubator Setup
Once you have your eggs, it’s time to set up your incubator. Here are some key points to consider:
1. **Temperature Control**: The ideal incubation temperature for quail eggs is around 99.5°F (37.5°C). Use a good thermometer to ensure stability.
2. **Humidity**: Maintaining the right humidity level is crucial. The humidity should be around 45-50% for the first 14 days; increase it to 65-70% during the last few days leading up to hatching.
3. **Ventilation**: Proper airflow is vital. Ensure your incubator has enough ventilation to maintain oxygen levels.
Turning the Eggs
Coturnix quail eggs need to be turned regularly to promote healthy embryo development. If your incubator doesn't have an automatic turning feature, plan to turn the eggs at least three times a day. Stop turning them three days before hatching to allow the embryos to position themselves for the big day.
Candling the Eggs
Personally, I do not candle my hatching eggs. In my opinion, eggs are either going to hatch or they’re not.
Candling involves shining a light through the eggs to check for embryo development. This can be done starting from day 7, and again on day 14. If you see a clear appearance inside the egg, it may not be fertile. This process can help you manage expectations before the hatch day arrives.
However, candling also comes with risks, especially with larger batches of eggs. While candling, the eggs may cool down which may impact enbryo development. This is especially true with larger batches of eggs but not as much of a concern with smaller batches. Regardless, I do not candle my own eggs.
Hatch Day!
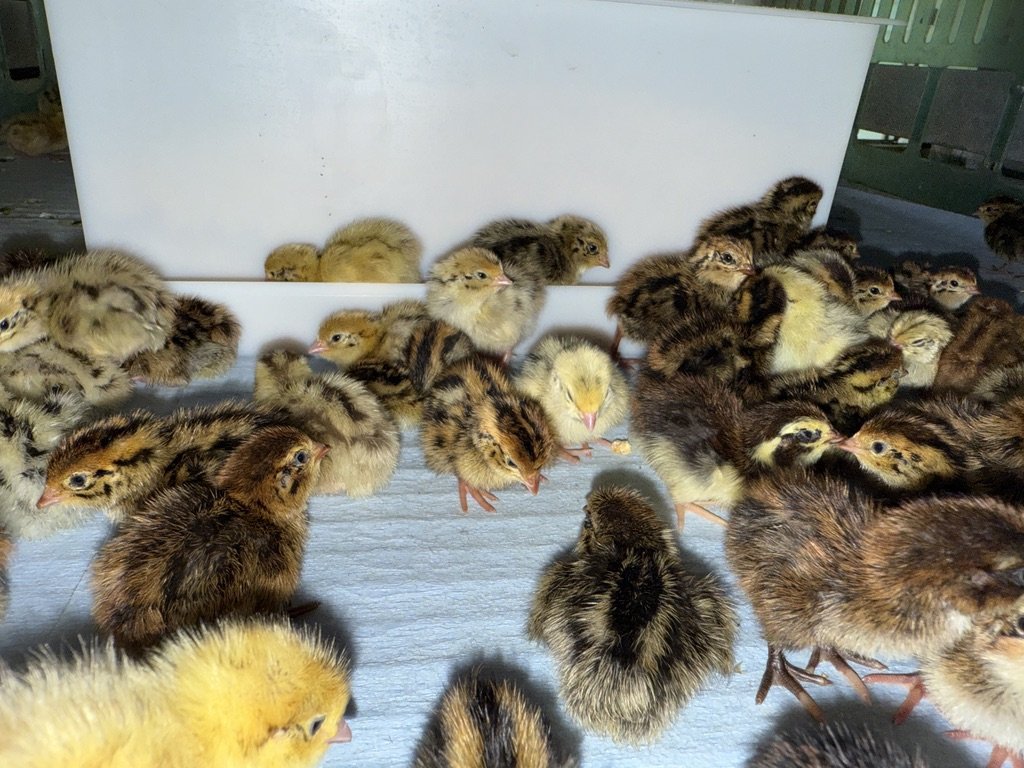
Mark your calendar! Coturnix quail typically hatch around 17 days after being placed in the incubator. Be prepared for some tiny, fluffy chicks to emerge! Avoid opening the incubator during the hatch to maintain the necessary humidity and temperature levels.
Post-Hatching Care
Once the chicks have hatched, you’ll want to move them to a brooder with a heat source to keep them warm. A temperature of around 95°F (35°C) is ideal for the first week. Gradually decrease the temperature as the chicks mature.
Final Thoughts
Incubating Coturnix quail eggs can be incredibly rewarding and is a fun way to immerse yourself in poultry keeping. With the right preparation and care, you'll soon be welcoming adorable little quail into your home. Don’t hesitate to reach out to fellow breeders or local resources for additional tips and encouragement. Happy hatching!
If you have any questions or need more information, feel free to reach out to me through facebook at www.facebook.com/juddsquail, and I’ll be happy to help. Happy quail breeding!
Ready to get started? Check out my shop and order your hatching eggs today!

What is Lockdown Day in Incubating? A Step-by-Step Guide
If you're new to incubating, you might be wondering: What exactly is lockdown? What does it involve? Let me walk you through the process and share a few insights I’ve picked up along the way.
If you're new to incubating, you might be wondering: What exactly is lockdown? What does it involve? Let me walk you through the process and share a few insights I’ve picked up along the way.
What is Lockdown?
Lockdown Day is simply the final stage before hatching. It’s the point when:
You remove the eggs from the turner or stop manually turning them.
You increase the humidity in the incubator.
And most importantly, you do not open or touch the incubator again until hatching is done.
If you're imagining something high-tech or complicated, it’s not. The term “lockdown” really just means: Quit messing with your eggs!
My Lockdown Process
Here’s how I handle it, step by step:
1. Remove Eggs from the Turner
I take the eggs out of the automatic turners and place them into my hatching trays.
2. Use a Liner
The baskets have a hard plastic bottom, which isn’t ideal for newly hatched chicks. I use a simple kitchen shelf liner (Dollar General sells a roll for about $1.50). This helps the chicks get a good grip and prevents splay leg, a condition where they can’t stand properly.
You can also use blue shop towels or another soft surface—just make sure your chicks aren’t hatching on slippery plastic.
3. Don’t Let Eggs Cool
Once the eggs are out of the turner, work quickly. You don’t want them to lose too much heat.
4. Set Humidity and Temperature
I use the Hatching Time CT120 incubator, which holds 312 eggs. I lock it down at:
Temperature: 99.5°F
Humidity: 65%
The goal is to maintain a stable, moist environment to support hatching. Make sure your water tank is full—you don’t want to run dry during lockdown.
To Candle or Not to Candle?
Some people candle eggs at lockdown. I don’t.
Here’s why:
Candling 312 eggs is time-consuming.
I believe if an egg is going to hatch, it will. If it’s not, candling won’t change that.
Every time you handle eggs or open the incubator, you risk cooling them down or affecting humidity.
If you’ve got a smaller batch (say, under 36 eggs), candling might be worthwhile. For me, it's just not efficient.
What Does Higher Humidity Actually Do?
A lot of folks say that raising humidity “softens the shell.” That’s not quite accurate.
In reality, higher humidity makes the membrane inside the shell more permeable. This:
Makes it easier for chicks to break through.
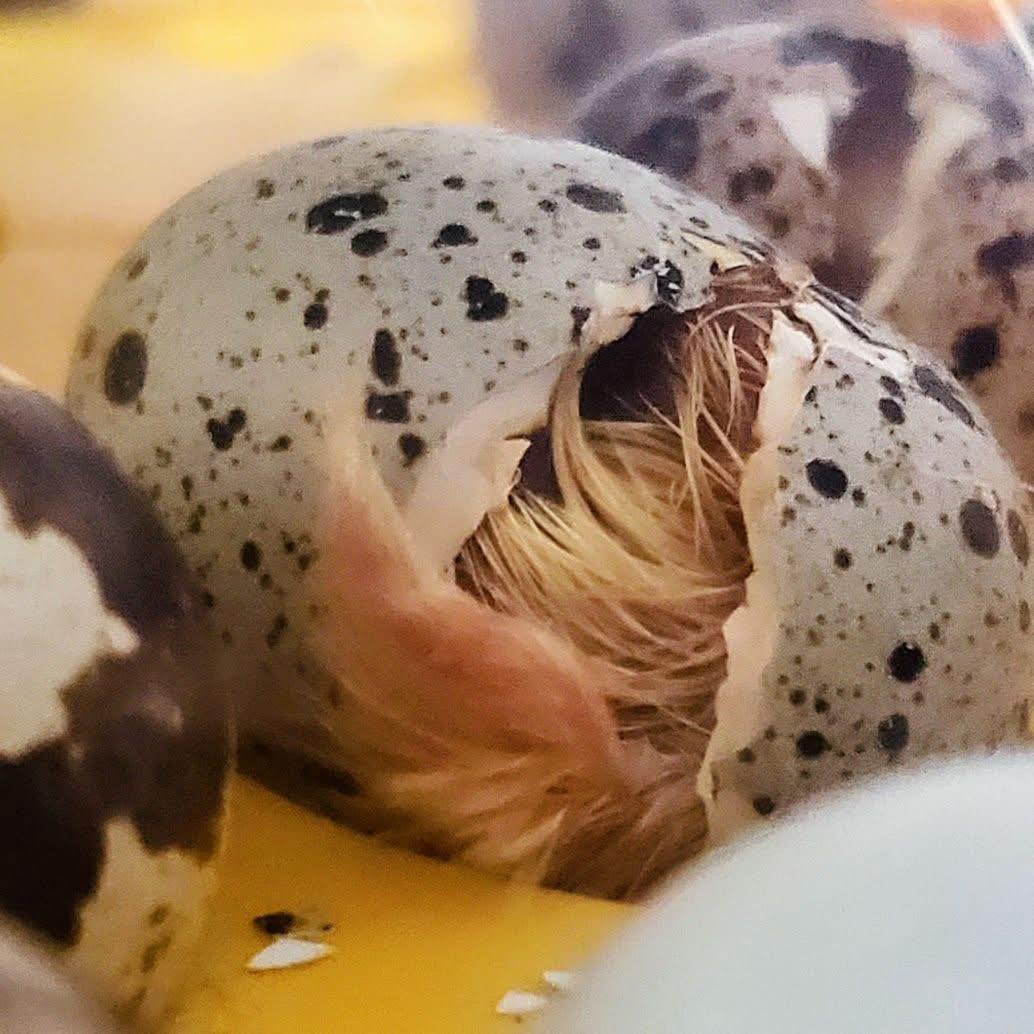
Helps keep the membrane moist during hatching, which prevents a condition called shrink-wrapping—when the membrane dries and traps the chick, often fatally.
This is why it’s so important not to open the incubator once lockdown begins. A sudden drop in humidity can cause shrink-wrapping and kill your chicks.
When Do I Remove the Chicks?
Chicks can stay in the incubator up to 72 hours after hatching. I typically start removing them after 48 hours. By then, most of them have hatched, and I want to move them to the brooder while they still have strength from the absorbed yolk.
If there are any late hatchers, I’ll leave those eggs in for a little longer. But usually, by 48 hours, the majority of the hatch is complete.
Final Thoughts
To recap, Lockdown Day is:
Taking the eggs out of the turners.
Placing them in hatching baskets with a soft liner.
Increasing the humidity to around 65%.
And not opening the incubator until hatching is complete.
That’s it. It’s not complicated—but it is important.
Thanks for following along. God bless, and happy hatching!
— Graham Judd, Judd’s Quail

Why You Need to Diversify on the Homestead
Hey folks! Today I want to talk about something that’s crucial for anyone homesteading, farming, or trying to generate income from home—diversification. Whether you're raising animals, gardening, or doing anything in between, putting all your eggs in one basket (literally, in my case) can spell trouble.
Hey folks! Today I want to talk about something that’s crucial for anyone homesteading, farming, or trying to generate income from home—diversification. Whether you're raising animals, gardening, or doing anything in between, putting all your eggs in one basket (literally, in my case) can spell trouble.
My Business: Quail Eggs
My main business is selling quail hatching eggs. That’s my bread and butter. But here’s the thing—what happens if my quail suddenly stop laying? Well, it’s happened before. For a couple of weeks earlier this year, my birds just weren’t laying the way they should. That meant I had to set up a waitlist and email customers to let them know there would be delays. Thankfully, I identified the issue, fixed it, and things got back on track.
Still, that experience was a wake-up call.
The Danger of a Single Source of Income
If you're just getting started with quail or any other homesteading venture, here's a lesson from me to you: build in backups. No matter what your main product or service is—quail, chickens, turkeys, goats, gardening, you name it—you need to plan for downtime.
Seasons change. Demand fluctuates. Animals don't always cooperate. For example, in the winter, sales of quail eggs drop significantly. (Pro tip: winter is actually a great time to buy hatching eggs—I’ve got a whole video on that if you're interested.)
If my income is 100% dependent on hatching eggs, and the birds stop laying or sales dip, I’m in a bind.
How I Created a Buffer
I sat down and figured out what I need to make to keep the lights on. Originally, that plan was based solely on hatching egg sales. But now? I’ve diversified. That includes:
Selling pickled eggs
Selling live quail and chicks
Selling processed birds
Gardening and selling canned goods
This buffer ensures that if hatching egg sales drop, I’ve got other ways to fill in the gaps.
Ideas for Diversifying on the Homestead
Here are a few ways you might diversify your income:
Raise multiple types of animals: Don’t just raise chickens—maybe include turkeys, goats, or ducks.
Sell byproducts: Eggs, milk, compost, feathers, etc.
Preserve and sell food: Grow a garden, can your produce, and sell it during the fall and winter when fresh goods are scarce.
Offer services or products: Workshops, farm tours, soap-making, breeding stock, or even online content.
The goal here is to build resiliency into your operation.
Practice What You Preach
Right now, I’ve even got turkey eggs on lockdown—and I don’t own any turkeys! I sold off my chickens when I committed to quail full-time, but that doesn’t mean I won’t reintroduce them in the future. That’s part of my long-term diversification plan. I’m focused, but flexible.
Follow Along
If you’re interested in homesteading, off-grid living, or just generating income from home, follow along! I’ve got more content on all of this:
YouTube: Cowgirls, Jesus, and Rodeo– Check out the homesteading playlist
Facebook: Judd’s Quail
Instagram: @juddsquail
TikTok: @juddsquail
Also, if you’re in the market for quality hatching supplies, click the "Hatching Time" button at the top of my website—you’ll find pens, incubators, brooders, and more. Shoot me a message, and I’ll even send you a $25 coupon for your next order.
Thanks for tuning in, y’all. Hope you could hear me over my noisy birds!
God bless, and we’ll see you next time.
Winning, Losing, and Moving Forward in Homesteading (and Life)
Hey everybody—Graham Judd here with Judd’s Quail. I was just in the quail barn in front of my GQF brooder, watching the little guys inside curiously eye the outside world like, “Hey, what are y’all doing out there?” It’s moments like this that remind me how far I’ve come in homesteading, in business, and in life.
Today, I want to talk about winning and losing—in homesteading, business, and even raising quail.
The Only Way to Truly Fail? Quit.
There’s a quote I love that says, “The only way to fail is to quit.”
Another one, from Derek Jeter (and no, I’m not a Yankees fan), sticks with me. When asked during his retirement about how he handled failure, he replied:
“I play a sport where if you get a hit three out of every ten times at bat, you're considered Hall of Fame material.”
Think about that. Seven out of ten times, even the best fail—and they’re still celebrated.
Homesteading Comes With Losses
I’ve had folks reach out saying their incubators didn’t work, their birds died, or predators got into their coops. Just recently, a friend lost his entire flock to neighborhood dogs.
It’s heartbreaking. But it’s part of the journey.
Whether it's a failed hatch or a garden that doesn’t thrive, failure in homesteading isn’t really failure. It's learning. It’s growth. You have to keep showing up, every day.
Don’t Believe Everything You See Online
Social media can be brutal. I posted a photo a few weeks ago of a snake that got into a quail cage—wasn’t even my snake, my quail, or my cage—and people came at me like it was my fault.
Online, everyone’s an expert. When the economy tanks, suddenly everyone’s an economist. When your garden fails, everyone’s a master gardener. But the truth? Most of them are keyboard warriors.
If you saw their setups in real life, you’d probably feel pretty proud of your own. So don’t let those voices get to you.
My Story: From Doubt to Determination
When I was in high school, a guidance counselor told me that if I didn’t take Algebra 2, I’d never amount to anything. Well, at 18, I was managing a retail store. At 22, I was running a photo operation for Disney World—the highest volume single-manager Kodak site in the world.
Later, I became a paramedic and faced more obstacles. A medical director (for political reasons) once said he’d make sure I’d never work in EMS again. Yet here I am, nearly 20 years later, still in the field. I’ve been an EMS manager for a university health system, directed a college EMS program, and even created a college degree for emergency medical services.
That high school kid with no Algebra 2? I’ve got a master’s degree—and I’m just four assignments away from a doctorate.
Homesteading Isn't Instant
You see those glossy YouTube videos—"We sold everything, moved to 5 acres, built a dream homestead..." That didn’t happen overnight.
Fifteen years ago, my first garden was 10x10 feet. It looked green in the photo, but everything died not long after. Last year, I had a quarter-acre garden. That’s progress. That’s persistence.
Your Mindset Is Everything
There was a time I was so broke I couldn’t pay attention. I worked two full-time jobs, had help from food pantries, and the church was paying my light bill. But even then, I refused to quit.
Whatever you do, don’t let someone else’s opinion stop you. Not a Facebook comment, not a TikTok critique, not even a neighbor’s doubts.
There are over 330 million people in this country. Are you going to let one of them ruin your day?
Nope.
I’m going to get up, take care of my birds, and keep working toward doing this full-time—because my family needs me, and this farm matters.
Let’s Grow Together
I don’t know what your goals are—but I’d love to hear them. Drop them in the comments.
If you watch YouTube, please like and subscribe to our family YouTube channel.
If you’re on Facebook, follow Judd’s Quail.
Have questions? Reach out. Head over to www.judsquail.com—my personal cell number is listed there. Call me. I’ll do my best to help. And if I don’t know the answer, I’ll tell you that, too.
God bless y’all—thanks for reading. Until next time, keep moving forward.
Why Quail Are the Perfect Addition to Any Homestead
We’ve all heard the saying that chickens are the “gateway drug” for homesteaders. You've probably seen the funny memes—“My wife asked for chickens... now we have three goats.” It’s funny because it’s kind of true! But today, I want to make the case for starting with quail instead of chickens.
Good morning, everybody! Whether you're sipping your first cup of coffee or tending to your animals, I hope your day is off to a great start. Today, I want to talk about something near and dear to my heart: quail, and why I believe they are the perfect animal to start your homesteading journey.
We’ve all heard the saying that chickens are the “gateway drug” for homesteaders. You've probably seen the funny memes—“My wife asked for chickens... now we have three goats.” It’s funny because it’s kind of true! But today, I want to make the case for starting with quail instead of chickens. Let me tell you why.
Meet the Quail
The coolest part about quail is they go from adorable little chicks to fully mature in just 8 weeks.. That’s incredibly fast when you compare it to chickens. If you had a brand new chicken chick today, you might not see your first egg for 6 months!
If you're trying to build a self-sufficient lifestyle—growing your own food, raising animals, and feeding your family—quail just make more sense. Don’t get me wrong, I love chickens. I raise them, I eat the eggs, and I enjoy the meat. But for beginners, quail offer a better return on investment.
Why Quail Make Sense
Here are a few reasons why quail are a smart first choice:
1. Fast Maturity
Quail are fully grown and start laying eggs around 6–8 weeks of age. Chickens, on the other hand, take 6–9 months to start producing.
2. Inexpensive to Start
You can often buy quail chicks for just $1–3 each. They're affordable and don’t require as much space or infrastructure to raise.
3. Quick Hatch Times
Quail hatch around day 17, sometimes even earlier. Chickens hatch on day 21 or later. That means you can raise more quail per year simply due to faster turnover.
4. More Efficient Egg Incubation
My incubator fits 36 chicken eggs—but it holds 120 quail eggs! Another one I own fits 90 chicken eggs or 300 quail eggs. That’s a huge difference in production potential.
5. Compact and Productive
You’ll need more quail per meal compared to a chicken, but they’re easy to raise in bulk. If you’re barbecuing—trust me—you’re going to want three or four per adult because they’re delicious!
Cost-Effective Homesteading
Getting into homesteading isn’t cheap. You need tools, fencing, feed, brooders, coops, and more. Quail make it easier. You can start with something as simple as a plastic tote, a heat source, some wood chips, a feeder, and a waterer. That’s it. Super simple and affordable.
Even off-grid homesteaders can raise quail successfully. If you’ve got a broody Silkie hen, she can hatch your quail eggs for you—no incubator needed! Just be sure to bring the chicks inside once they hatch, as the size difference can be dangerous for the little ones.
From Hobby to Full-Time Farming
I wish I had known about quail when I started. My wife and I have been homesteading for over 10 years now. It’s been a slow road—we’ve both worked traditional jobs the whole time. But little by little, we’re moving toward full-time farming. And a huge part of that progress has come from quail.
If you’re thinking about starting your homestead or just want to dip your toes into self-sufficiency, I truly believe quail are the way to go.
Stay Connected
If you’ve got questions about quail, homesteading, or just want to talk about life or the Bible, I’d love to connect with you. Here’s where you can find me:
Facebook: Judd’s Quail
YouTube: Cowgirl Jesus and Rodeo
Website: www.juddsquail.com
Thanks for spending some time with me today. Grab another cup of coffee, give your animals some love, and remember: great things start small—just like a quail egg.
God bless you, and we’ll see you next time.

Why I Started Raising Quail—and What You Need to Know Before You Do Too
When I started out, I thought I had it all figured out. I had raised chickens before, so I figured raising quail couldn’t be all that different. But I quickly learned that, while similar in some ways, raising quail comes with its own set of unique challenges.
Hey everybody, this is Graham with Judd’s Quail. Today, I want to share a little bit about why I started raising quail and some crucial tips if you're thinking about starting too.
For those of you who are new to my blog, welcome! I started this journey not just out of passion, but out of necessity. My wife is currently battling brain cancer. It all began with breast cancer, which later metastasized to her brain. After surgery to remove one spot, two more grew back. She’s a strong woman, but she’s very sick—and she needs me home.
So, I turned to raising quail as a way to support my family while being present for my wife and my three daughters—14-year-old twins and an 11-year-old. This isn’t just a hobby. It’s a calling, a business, and a way to be there for my family when they need me most.
If you'd like to support us, you can head over to our shop tab at judsquail.com/shop to order quail eggs. Every order helps us more than you know.
What I Wish I Knew Before Starting With Quail
When I started out, I thought I had it all figured out. I had raised chickens before, so I figured raising quail couldn’t be all that different. But I quickly learned that, while similar in some ways, raising quail comes with its own set of unique challenges.
Honestly? I now prefer quail to chickens. They take up less space, they lay more eggs, they’re easier to process, and they hatch faster (17 days vs. 21 days for chickens). But if you’re thinking of starting your own quail journey, let me give you the advice I wish I had at the beginning:
1. Infrastructure Is Everything
The number one thing to get right from the start is your infrastructure. Quail multiply fast, and it's very easy to end up with way more birds than you have space for. And when that happens, things can go downhill fast.
Incubation: If you’re hatching eggs, you’ll need a good incubator. I can hatch up to 480 eggs at a time—but that means I need a solid plan for what to do with 400+ chicks.
Brooding: A plastic tote with pine shavings, a heat lamp, feeder, and waterer can work for about 20 chicks. And even then, only for the first two weeks. After that, space gets tight fast. Overcrowding leads to “piling,” where chicks smother each other trying to stay warm. This can result in a whole bunch of dead chicks, which has now cost you time and money.
Space guideline:
Up to 2 weeks: 6 chicks per square foot
3 + weeks: 3.5 chicks per square foot
For jumbos: Stick to 3 per square foot
Grow-out Pens: After the brooder stage, you’ll need pens for them to grow until processing or egg-laying. I currently have two grow-out pens that hold 50 birds each. That’s only enough for 100 birds, and if I hatch 400, you can see the problem.
2. Plan Ahead—or Prepare to Be Overwhelmed
Everything from heat lamps to pens to water systems needs to be ready before hatch day. Trust me—once the chicks are here, it’s too late to be scrambling.
I’ve lost birds to unexpected cold snaps and heat waves, simply because I didn’t have enough safe, climate-appropriate space ready. I learned from these mistakes and want to help you avoid these pitfalls in the first place.
Remember what they used to tell us in business school:
“Poor planning leads to poor results. Prior planning leads to positive results.”
Final Thoughts
I love raising quail, and I truly believe it’s a great way to support a family, build a homestead, or even start a small business. But it takes planning. It takes heart. And it takes a willingness to learn.
If you’ve got questions or need help getting started, feel free to reach out. You can email or text me—my contact info is available at judsquail.com/about. I'm happy to help however I can.
Thanks for reading. God bless you and your family, and I hope you’ll come along on this journey with me.
—Graham
JudsQuail.com
“Raising birds. Loving Jesus. Supporting my family.”